Step 1. Initial Inspection and Safety Check We begin by unplugging the dryer and, if it's a gas model, safely shutting off the gas supply. A visual inspection is performed to assess the vent condition, check airflow restrictions, and identify potential hazards like crushed ducting or disconnected sections.
Step 2. Move and Access the Dryer The dryer is carefully pulled away from the wall to access the rear vent connection. We take precautions to avoid damaging flooring or surrounding cabinetry and ensure hoses or gas lines are not under strain.
Step 3. Disconnect the Vent Duct The exhaust duct is detached from the back of the dryer and the wall or floor vent port. At this stage, we inspect for lint buildup, kinks, or degraded materials that could compromise airflow or safety.
Step 4. Inspect and Clean the Transition Duct We examine the transition duct (the short length of duct between dryer and wall) for signs of wear or clogging. Using a flexible rotary brush and vacuum, we clean out accumulated lint and debris from both ends.
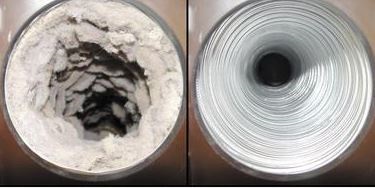
Step 5. Power Clean the Vent Line Using a professional-grade rotary brush system with a high-powered vacuum, we thoroughly clean the full length of the vent line from inside the house to the exterior termination point. This process removes lint, nesting debris, and any obstructions that could reduce dryer efficiency or pose a fire risk.
Step 6. Clean the Exterior Vent Hood The vent hood is cleaned of lint, cobwebs, bird nests, or other blockages. We ensure that the backdraft damper opens and closes freely and confirm there is no screen that could trap lint and restrict airflow.
Step 7. Inspect and Repair Damaged Components If we find torn or disconnected duct sections, outdated foil or plastic ducts, or improperly sealed joints, we recommend repairs or full replacements using rigid or semi-rigid metal ducting. This ensures the system is up to code and built for long-term performance.
Step 8. Reassemble and Seal Connections We reconnect all ducting using UL-listed foil tape, avoiding screws or fasteners that can trap lint. The dryer is repositioned carefully to avoid crushing the vent and maintain a clear airflow path.
Step 9. Test Airflow and Dryer Performance With everything reconnected, we plug the dryer back in, restore the gas if applicable, and run a timed dry cycle. We use an airflow meter to verify proper vent flow and measure exhaust velocity, ensuring optimal dryer function.
Step 10. Final Walkthrough and Maintenance Tips We walk the customer through our work, share before-and-after results, and provide tips on maintaining a safe vent system. For seniors or busy families, we also offer reminders for annual cleanings to prevent future hazards.
|